

Wes Mountain/The Pharmaceutical Journal
By the end of this article, you will be able to:
- Outline primary considerations of undertaking a physical examination;
- Describe each of the techniques involved in the physical examination, highlighting their role and demonstrating their practical application in the clinical setting;
- Appreciate the need for physical examinations to be individualised and some of the challenges this may present;
- Identify how you can develop your own physical examination skills for your prescribing role.

RCPharm Competency Framework for All Prescribers
This article is aimed to support the development of knowledge and skills related to the following competencies:
Domain 1: Assess the patient (1.1, 1.2, 1.7, 1.14)
- Undertakes the consultation in an appropriate setting;
- Considers patient dignity, capacity, consent and confidentiality;
- Undertakes and documents an appropriate clinical assessment;
- Refers to or seeks guidance from another member of the team, a specialist or appropriate information source when necessary.
Introduction
The main purpose of patient assessment is to gather further information to confirm or refute potential differential diagnoses, or to monitor disease progression and changes in the patient’s health condition. It incorporates physical examinations, further tests and/or investigations. This article specifically discusses the physical examination component of patient assessment.
It is recommended that you read this article in conjunction with these resources from The Pharmaceutical Journal:
- ‘Introduction to the prescribing consultation‘;
- ‘Principles of effective history taking when prescribing‘;
- ‘Introduction to clinical assessment for prescribers‘.
A consultation has been described as a process for converting a problem that the patient may present with into a plan[1]. This will involve initial observations and a comprehensive history. It may be possible to make a diagnosis from just these initial activities but there may also be a need to conduct further patient assessments, which may include physical examinations, further tests and/or investigations[2]. The information gathered at each stage of the consultation will guide the practitioner on the type and amount of patient assessments required. Practitioners need to listen to the patient and be directed to which, if any, patient assessments are required. Patient assessments also provide an opportunity to identify any ‘red flags’ in a patient, which are symptoms or characteristics that would warrant further investigation or escalation of care.
Observation of the patient is important throughout the physical examination. This starts the moment the prescriber sees the patient, where they can start to assess how unwell the patient is and should continue throughout the consultation. Initially, assessment involves a thorough visual examination of the patient’s body, hands and face, including skin, posture and movement. Overall appearance and body language also provide crucial information that can aid in identifying potential health issues, abnormalities, emotional distress or mental health-related problems, or potential safeguarding concerns. Sometimes these initial observations and a few minutes spent talking to the patient may reveal care needs that should be escalated or move the consultation in an unexpected direction[3]. The physical examination is a unique situation in which both patient and practitioner understand that the interaction is intended to be diagnostic and therapeutic.
Physical examination
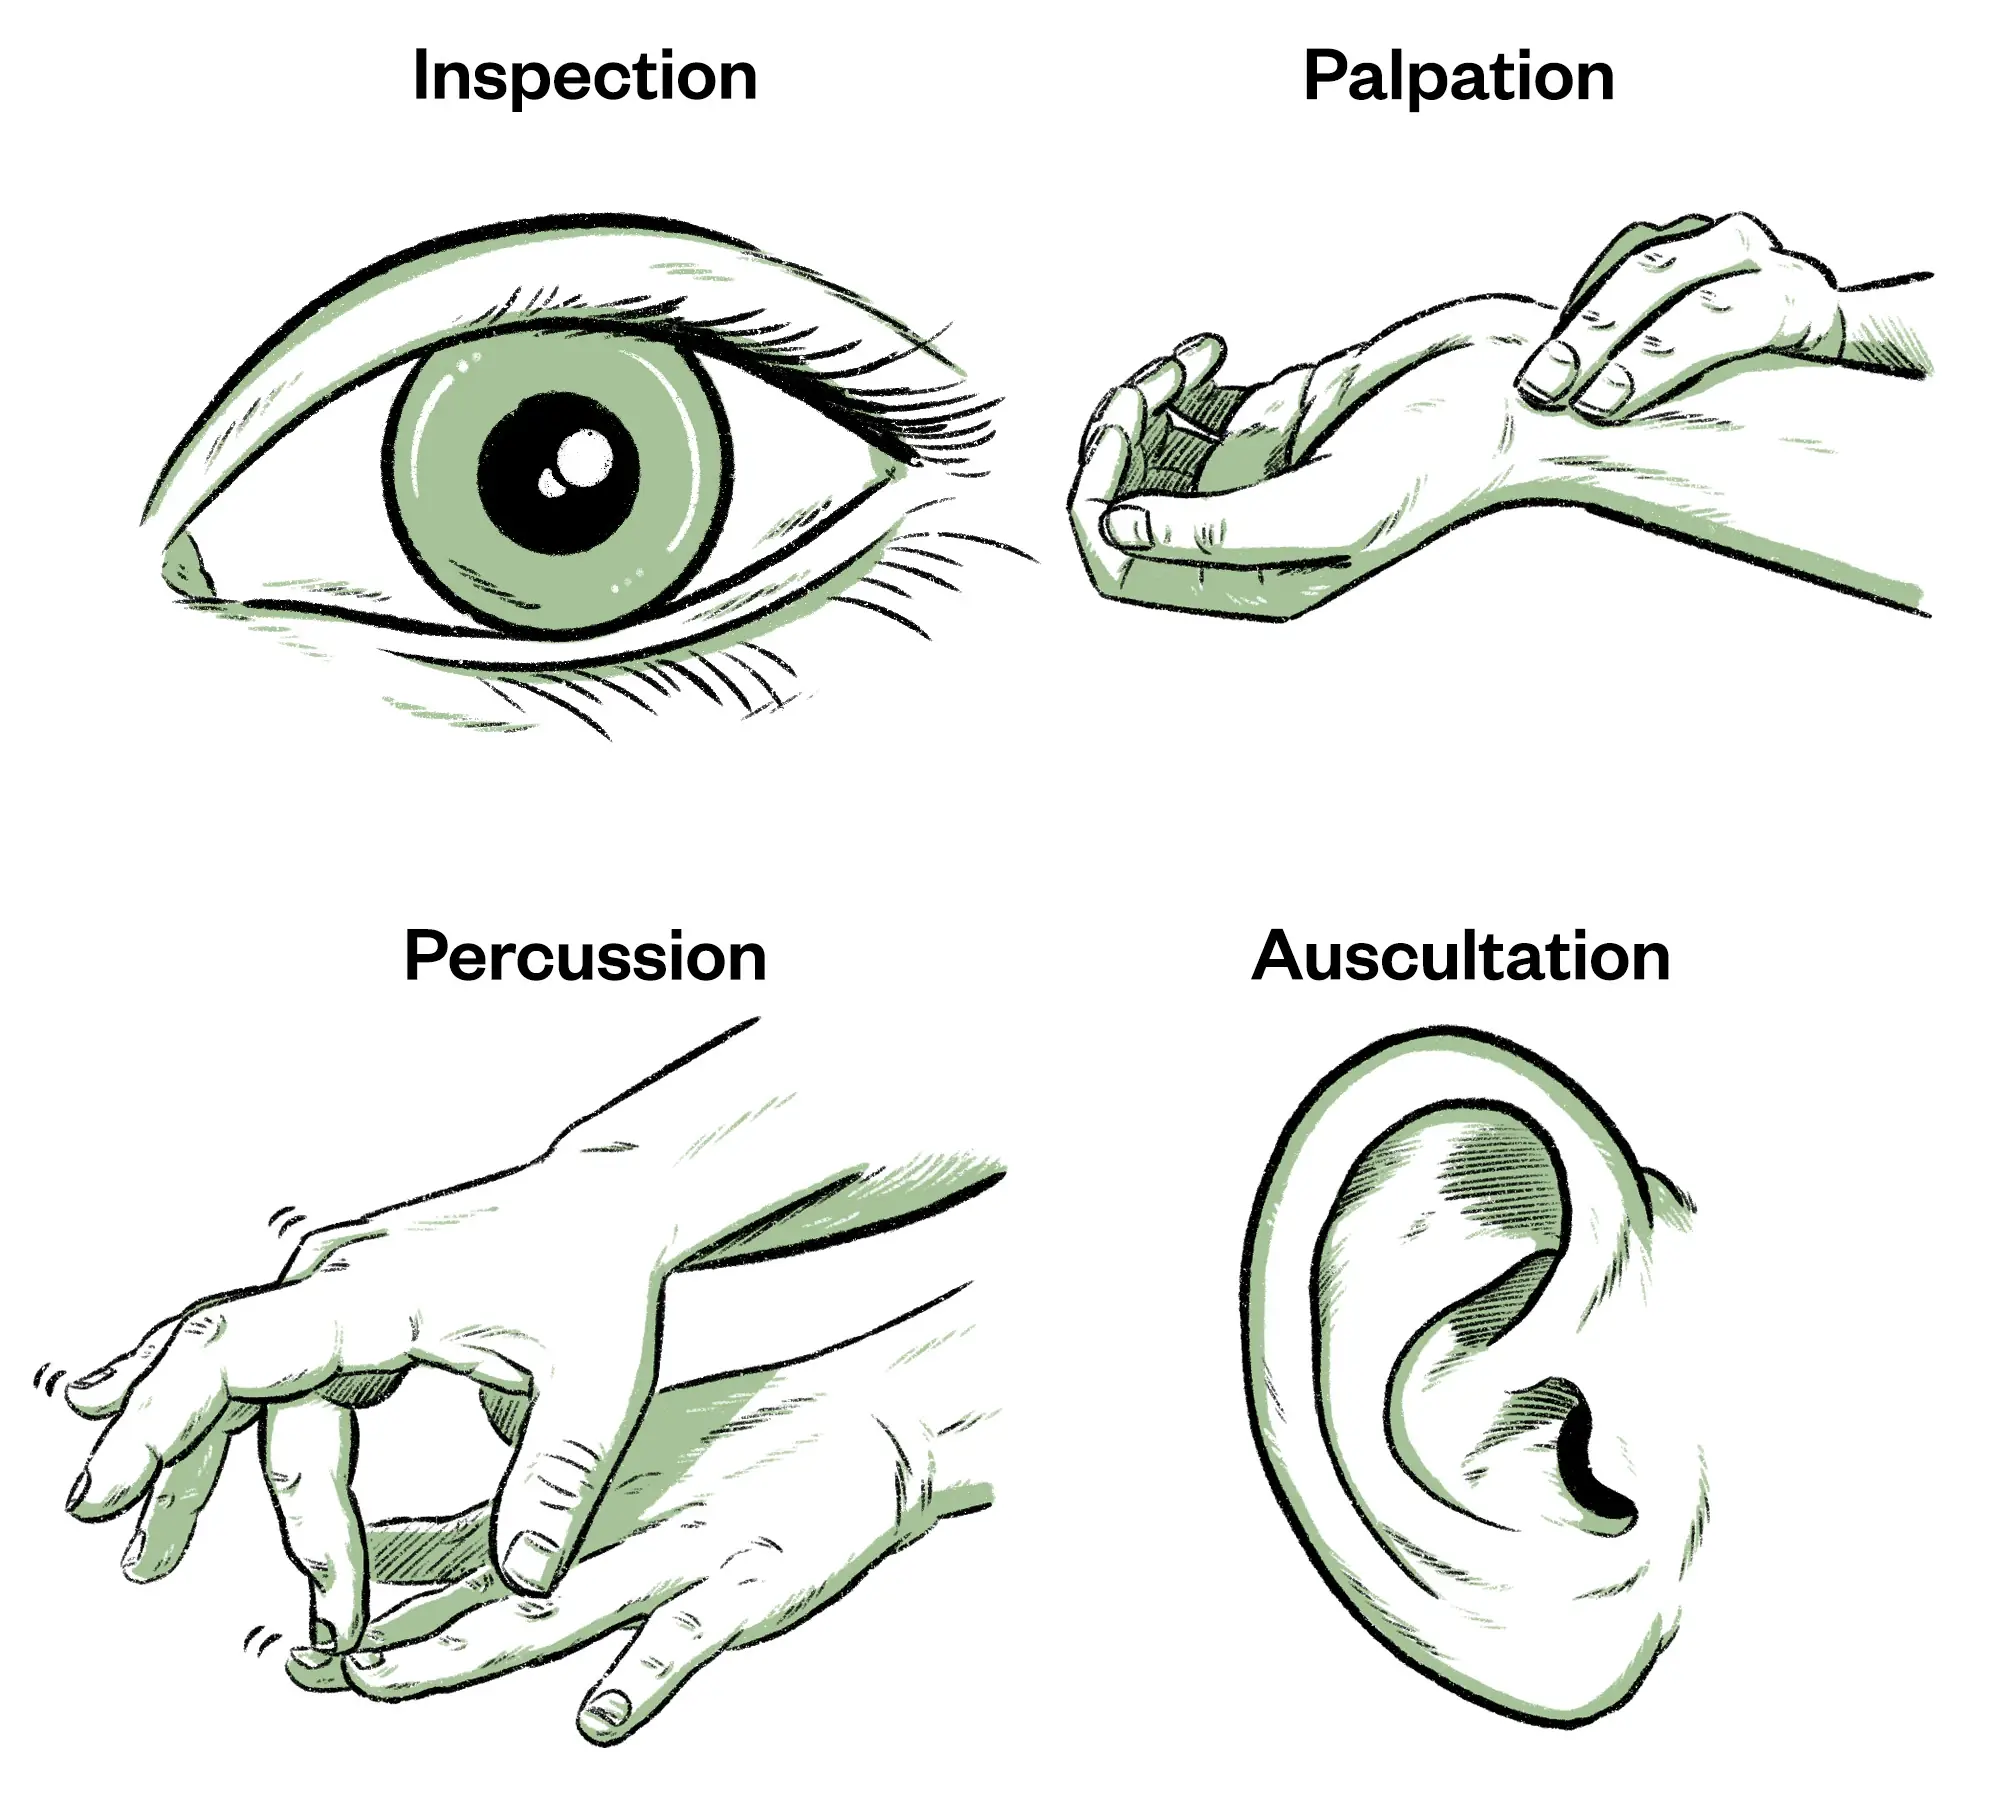
To develop a comprehensive understanding of a patient’s condition, practitioners need to employ a systematic approach to physical examination that involves four primary techniques: inspection, palpation, percussion and auscultation. These techniques serve as the cornerstone of the physical examination, helping practitioners detect abnormalities, establish or refute diagnoses, and develop treatment plans.
Wes Mountain/The Pharmaceutical Journal
Inspection
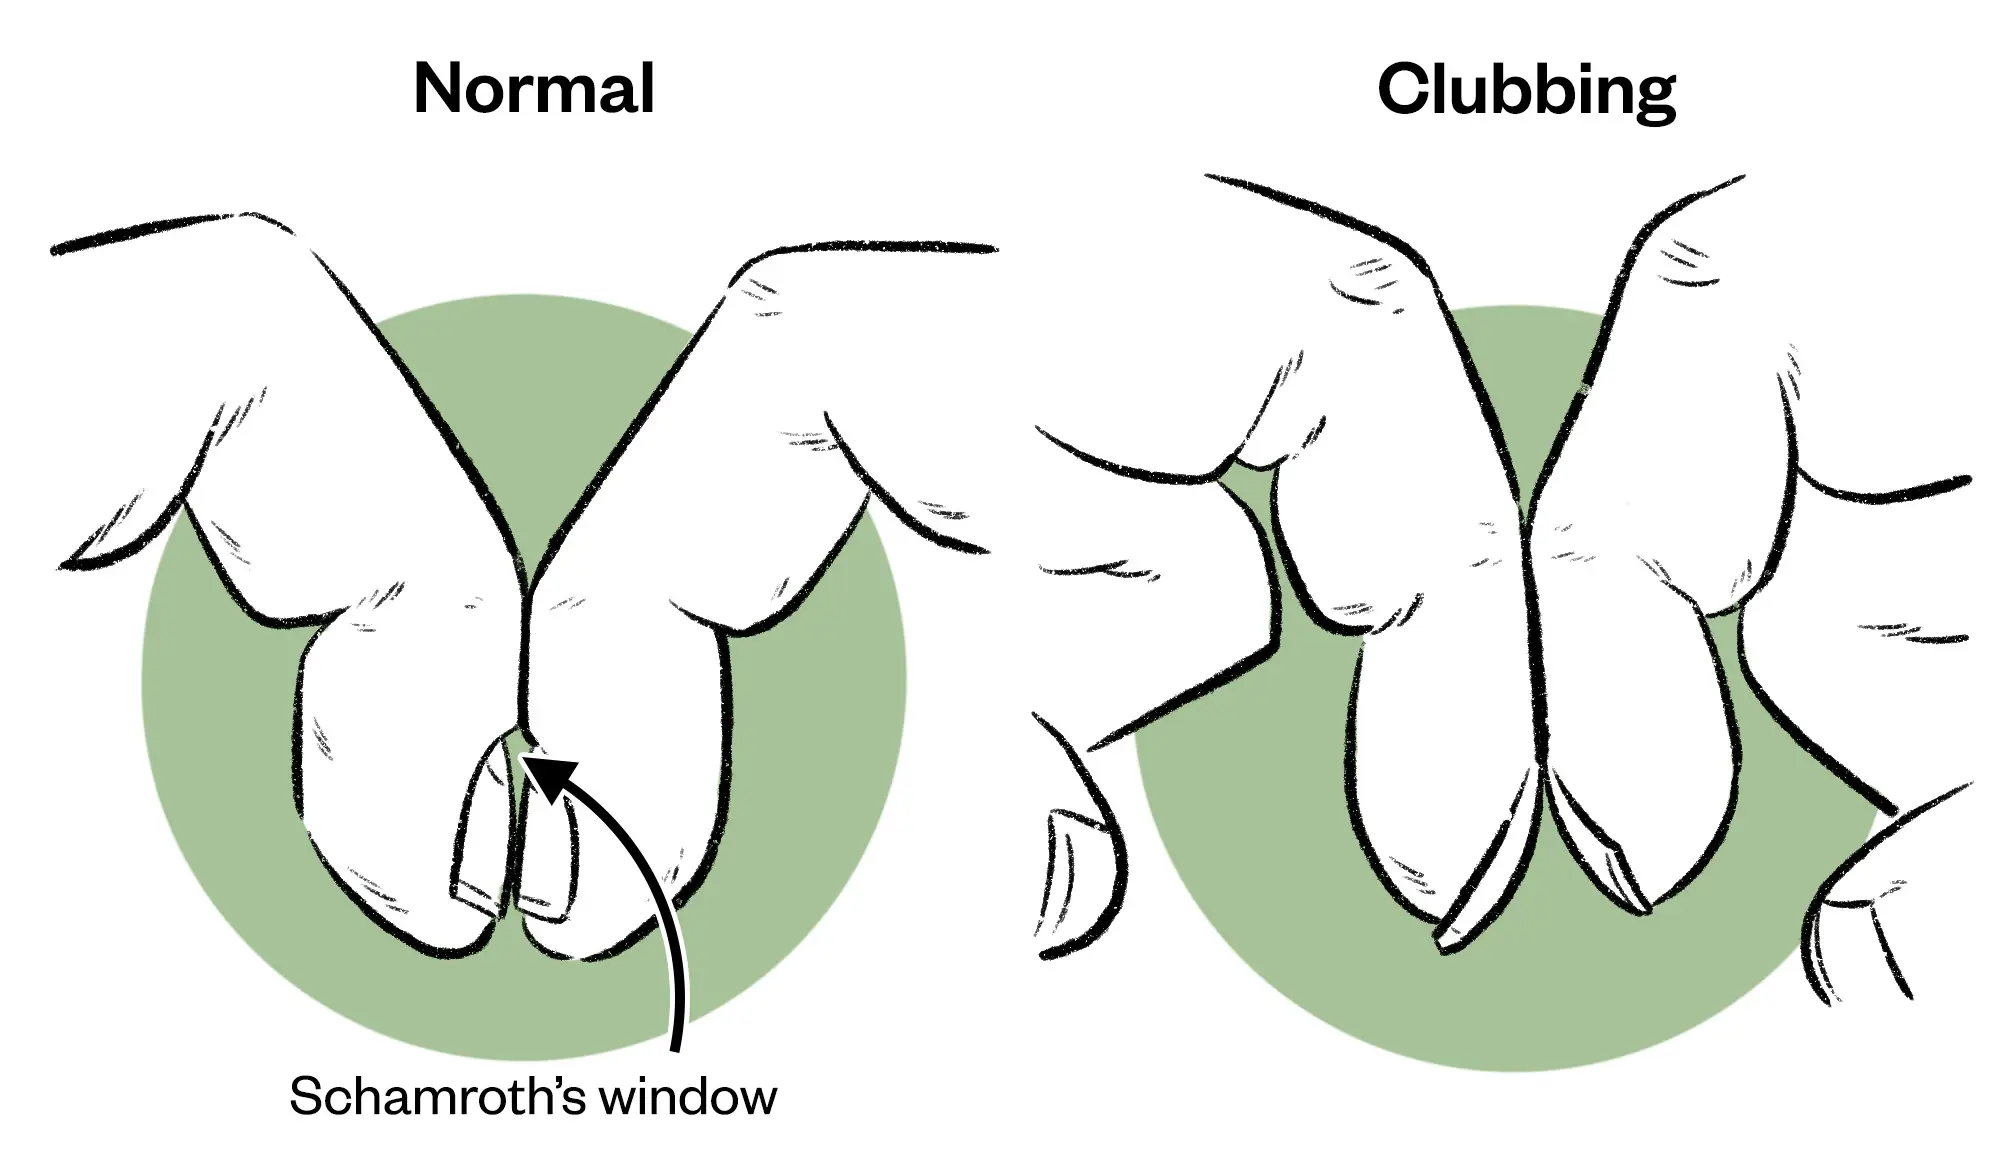
Inspection is where the practitioner looks at specific body areas and systems, which may be relevant to the differential diagnoses formulated from the patient history. This may mean that it is necessary to inspect the body system holistically, with a view to finding information about the functionality of the organ (e.g. cold extremities may indicate poor circulation, such as vascular problems). A thorough inspection of the patient’s hands for nail deformities, colour and temperature can also reveal important health issues and are part of the cardiovascular, respiratory and gastrointestinal physical examination process. Table 1 provides an example of inspection for a respiratory assessment, with rationale.
Wes Mountain/The Pharmaceutical Journal
Palpation
Palpation is a hands-on method that involves the gentle application of pressure with fingers and hands to various parts of the body to evaluate the texture, consistency, temperature and the presence of tenderness/pain or abnormalities. Through palpation, prescribers can assess a wide range of conditions, from musculoskeletal issues to internal organ abnormalities. For example, in physical examinations, palpation allows practitioners to locate and assess areas of pain, identify swollen or inflamed areas such as swollen cervical lymph glands and determine the presence of masses or tumours. Additionally, it helps in assessing muscle tone, joint mobility and the presence of trigger points in musculoskeletal assessments.
There is light (superficial) palpation where the fingers depress 1–2cm and deep palpation of 4–5cm, where the depression is deep and firm. Light palpation should always precede deep palpation. Areas of tenderness should be palpated last for the comfort of the patient and practitioners should be observing the patient throughout for any signs of discomfort. Palpation is not only a valuable diagnostic tool but also aids in building trust and rapport between the prescriber and the patient, as it involves physical contact and communication that enhances the patient’s overall healthcare experience. Table 2 provides an example of palpation for a gastrointestinal assessment, with rationale for each component.
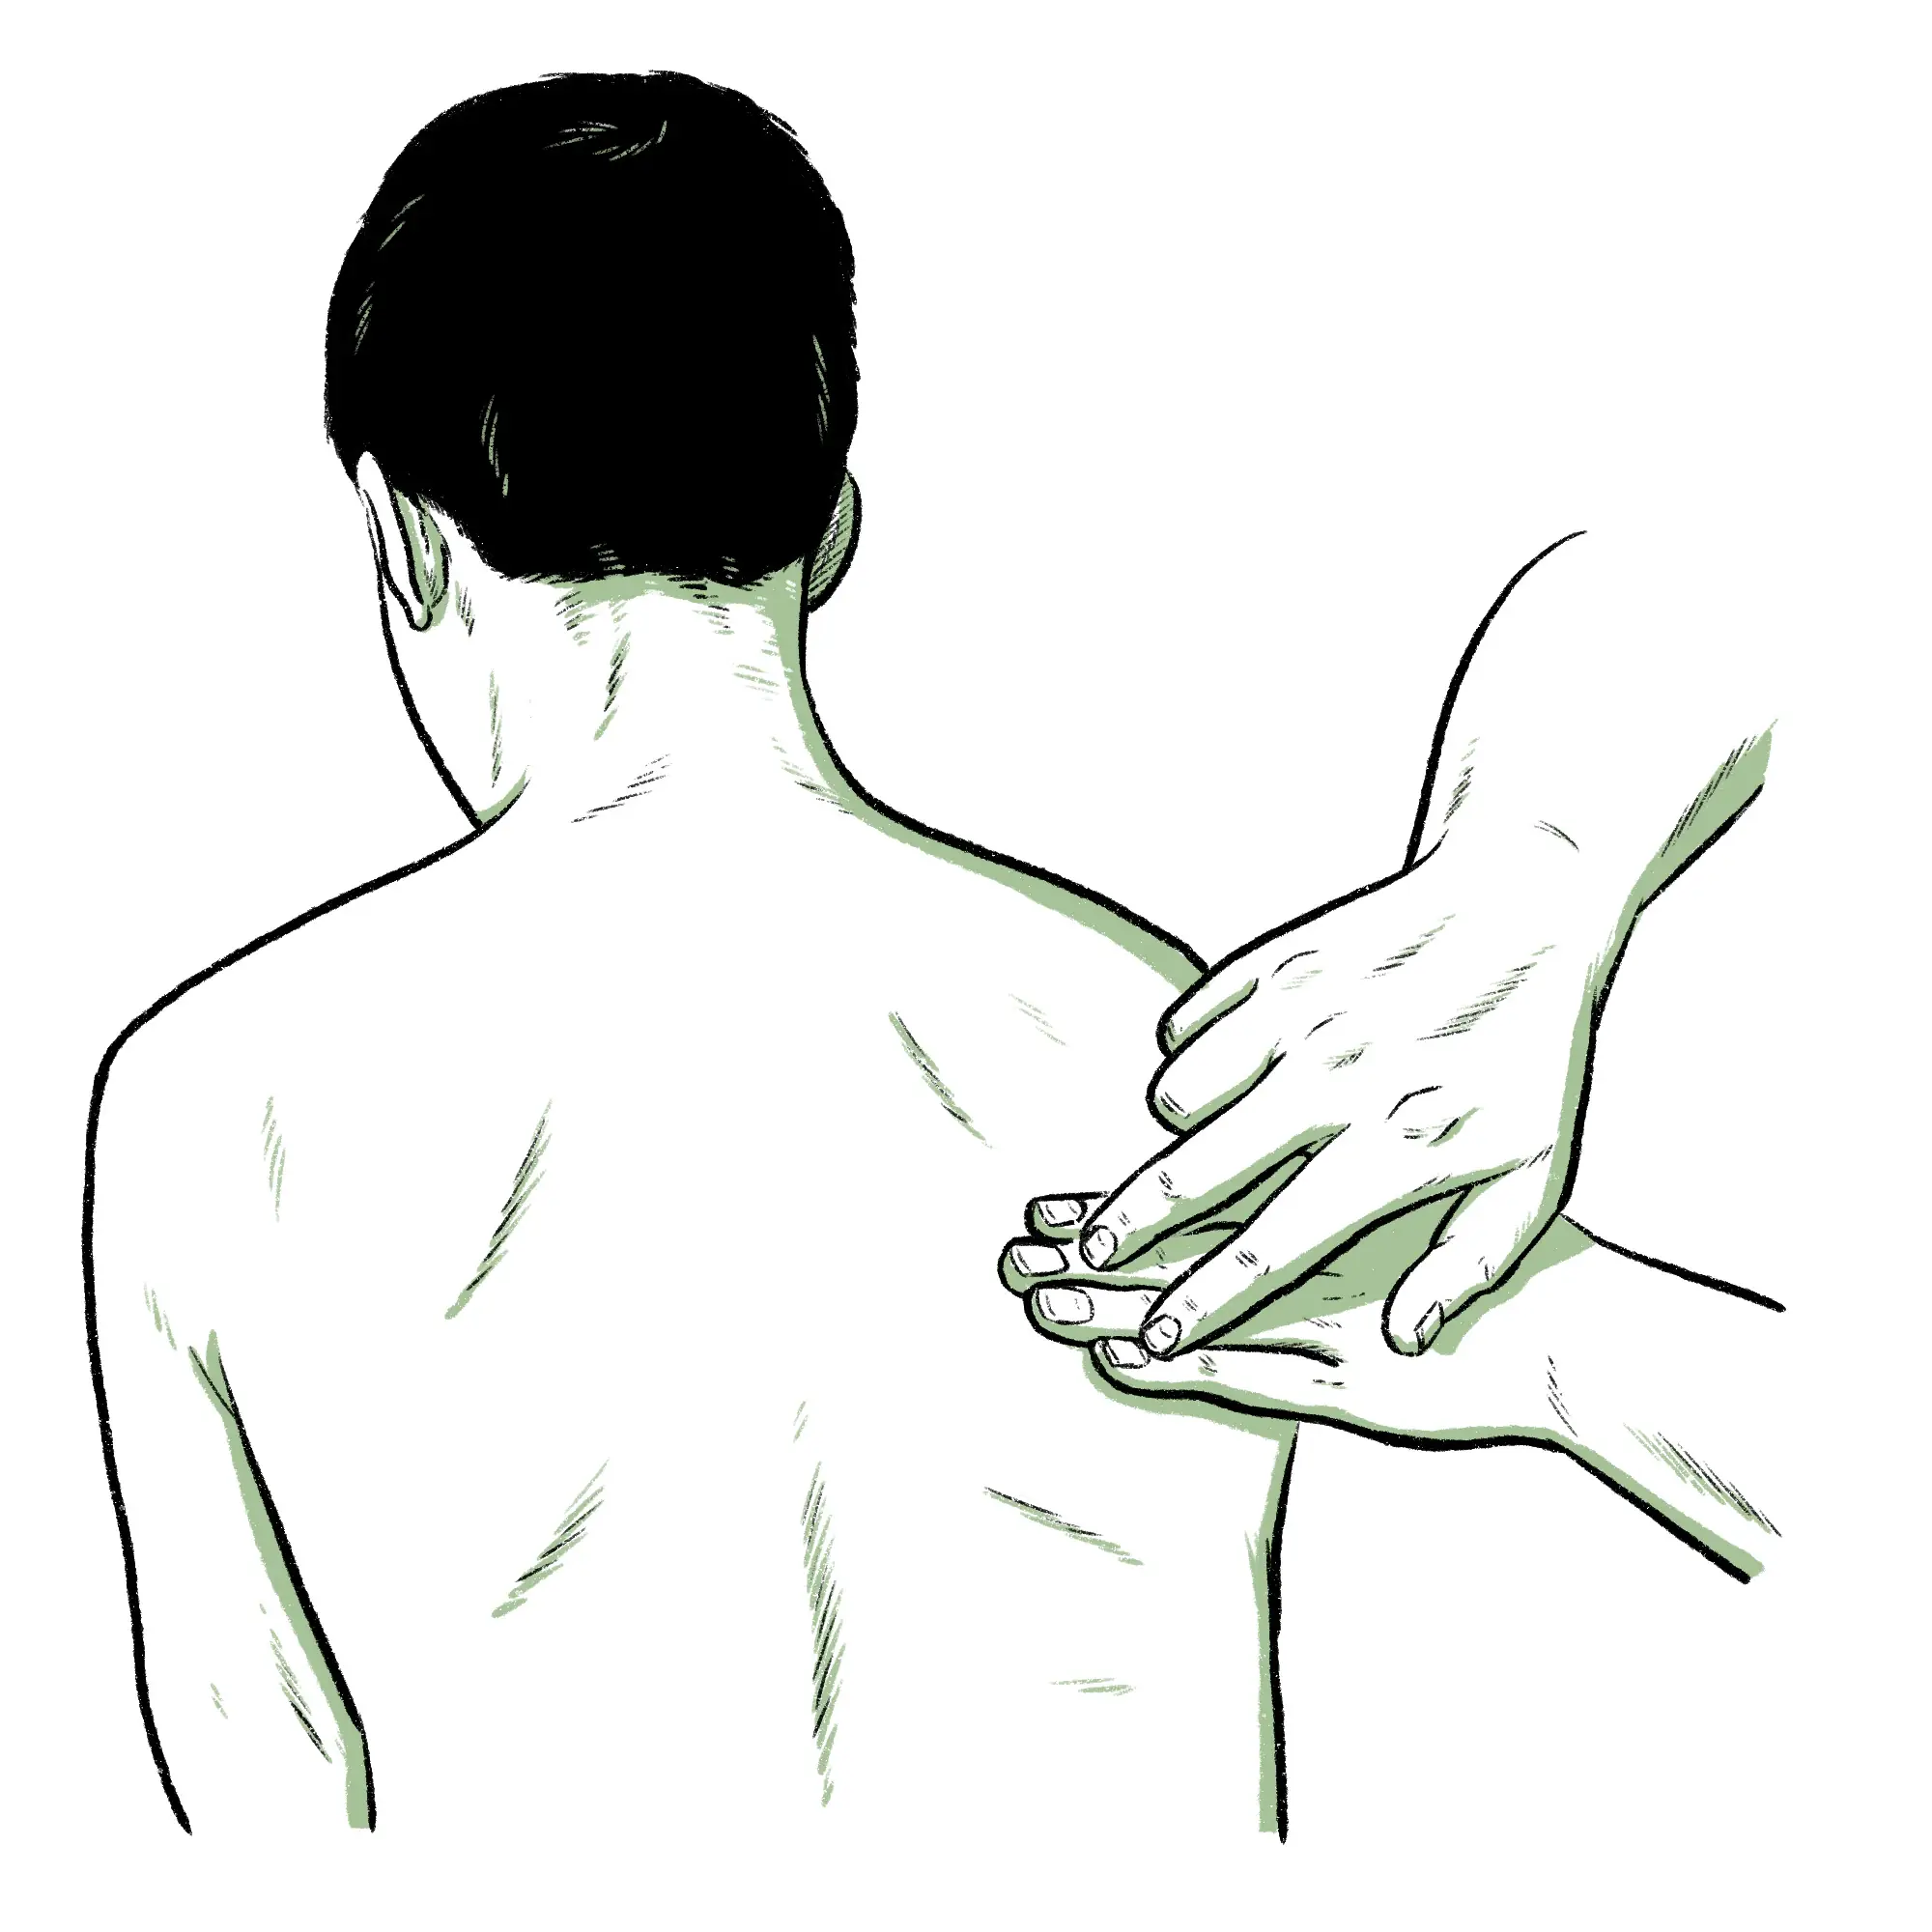
Percussion
Percussion is a non-invasive technique that enhances clinical assessment by providing additional diagnostic clues. The two methods of percussion that can be used are either direct or indirect. Direct percussion is where the striking hand contacts the body; for example, to assess pain in the adult sinus areas or percussing the infant’s thorax. Indirect percussion, which is more commonly used, involves using both hands, where the striking hand contacts the stationary hand, which is fixed on the person’s skin (see Figure 3). By tapping specific areas of the body, typically the chest and abdomen, practitioners can assess the density and resonance of underlying tissues and organs. Percussion is also used to determine the size and shape of internal organs by establishing their borders. It indicates whether tissue is fluid filled, air filled or solid[4]. Dense areas (such as an organ, mass or consolidation) will produce a dull sound, whereas air-filled spaces (such as airways) will produce a resonant sound. A percussion sound is described according to its intensity, pitch, duration and quality. In the context of respiratory assessments, percussion aids in identifying conditions, such as pneumonia or pleural effusion, by evaluating the presence of dullness or lack of resonance in lung fields. In abdominal examinations, it assists in identifying organ enlargement, fluid build-up or potential masses.
Wes Mountain/The Pharmaceutical Journal
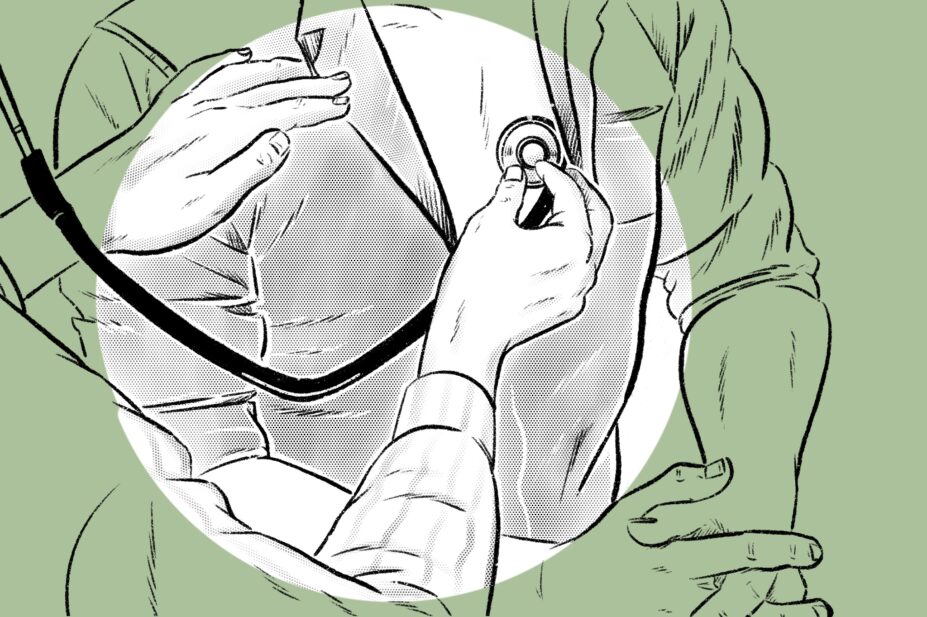
Auscultation
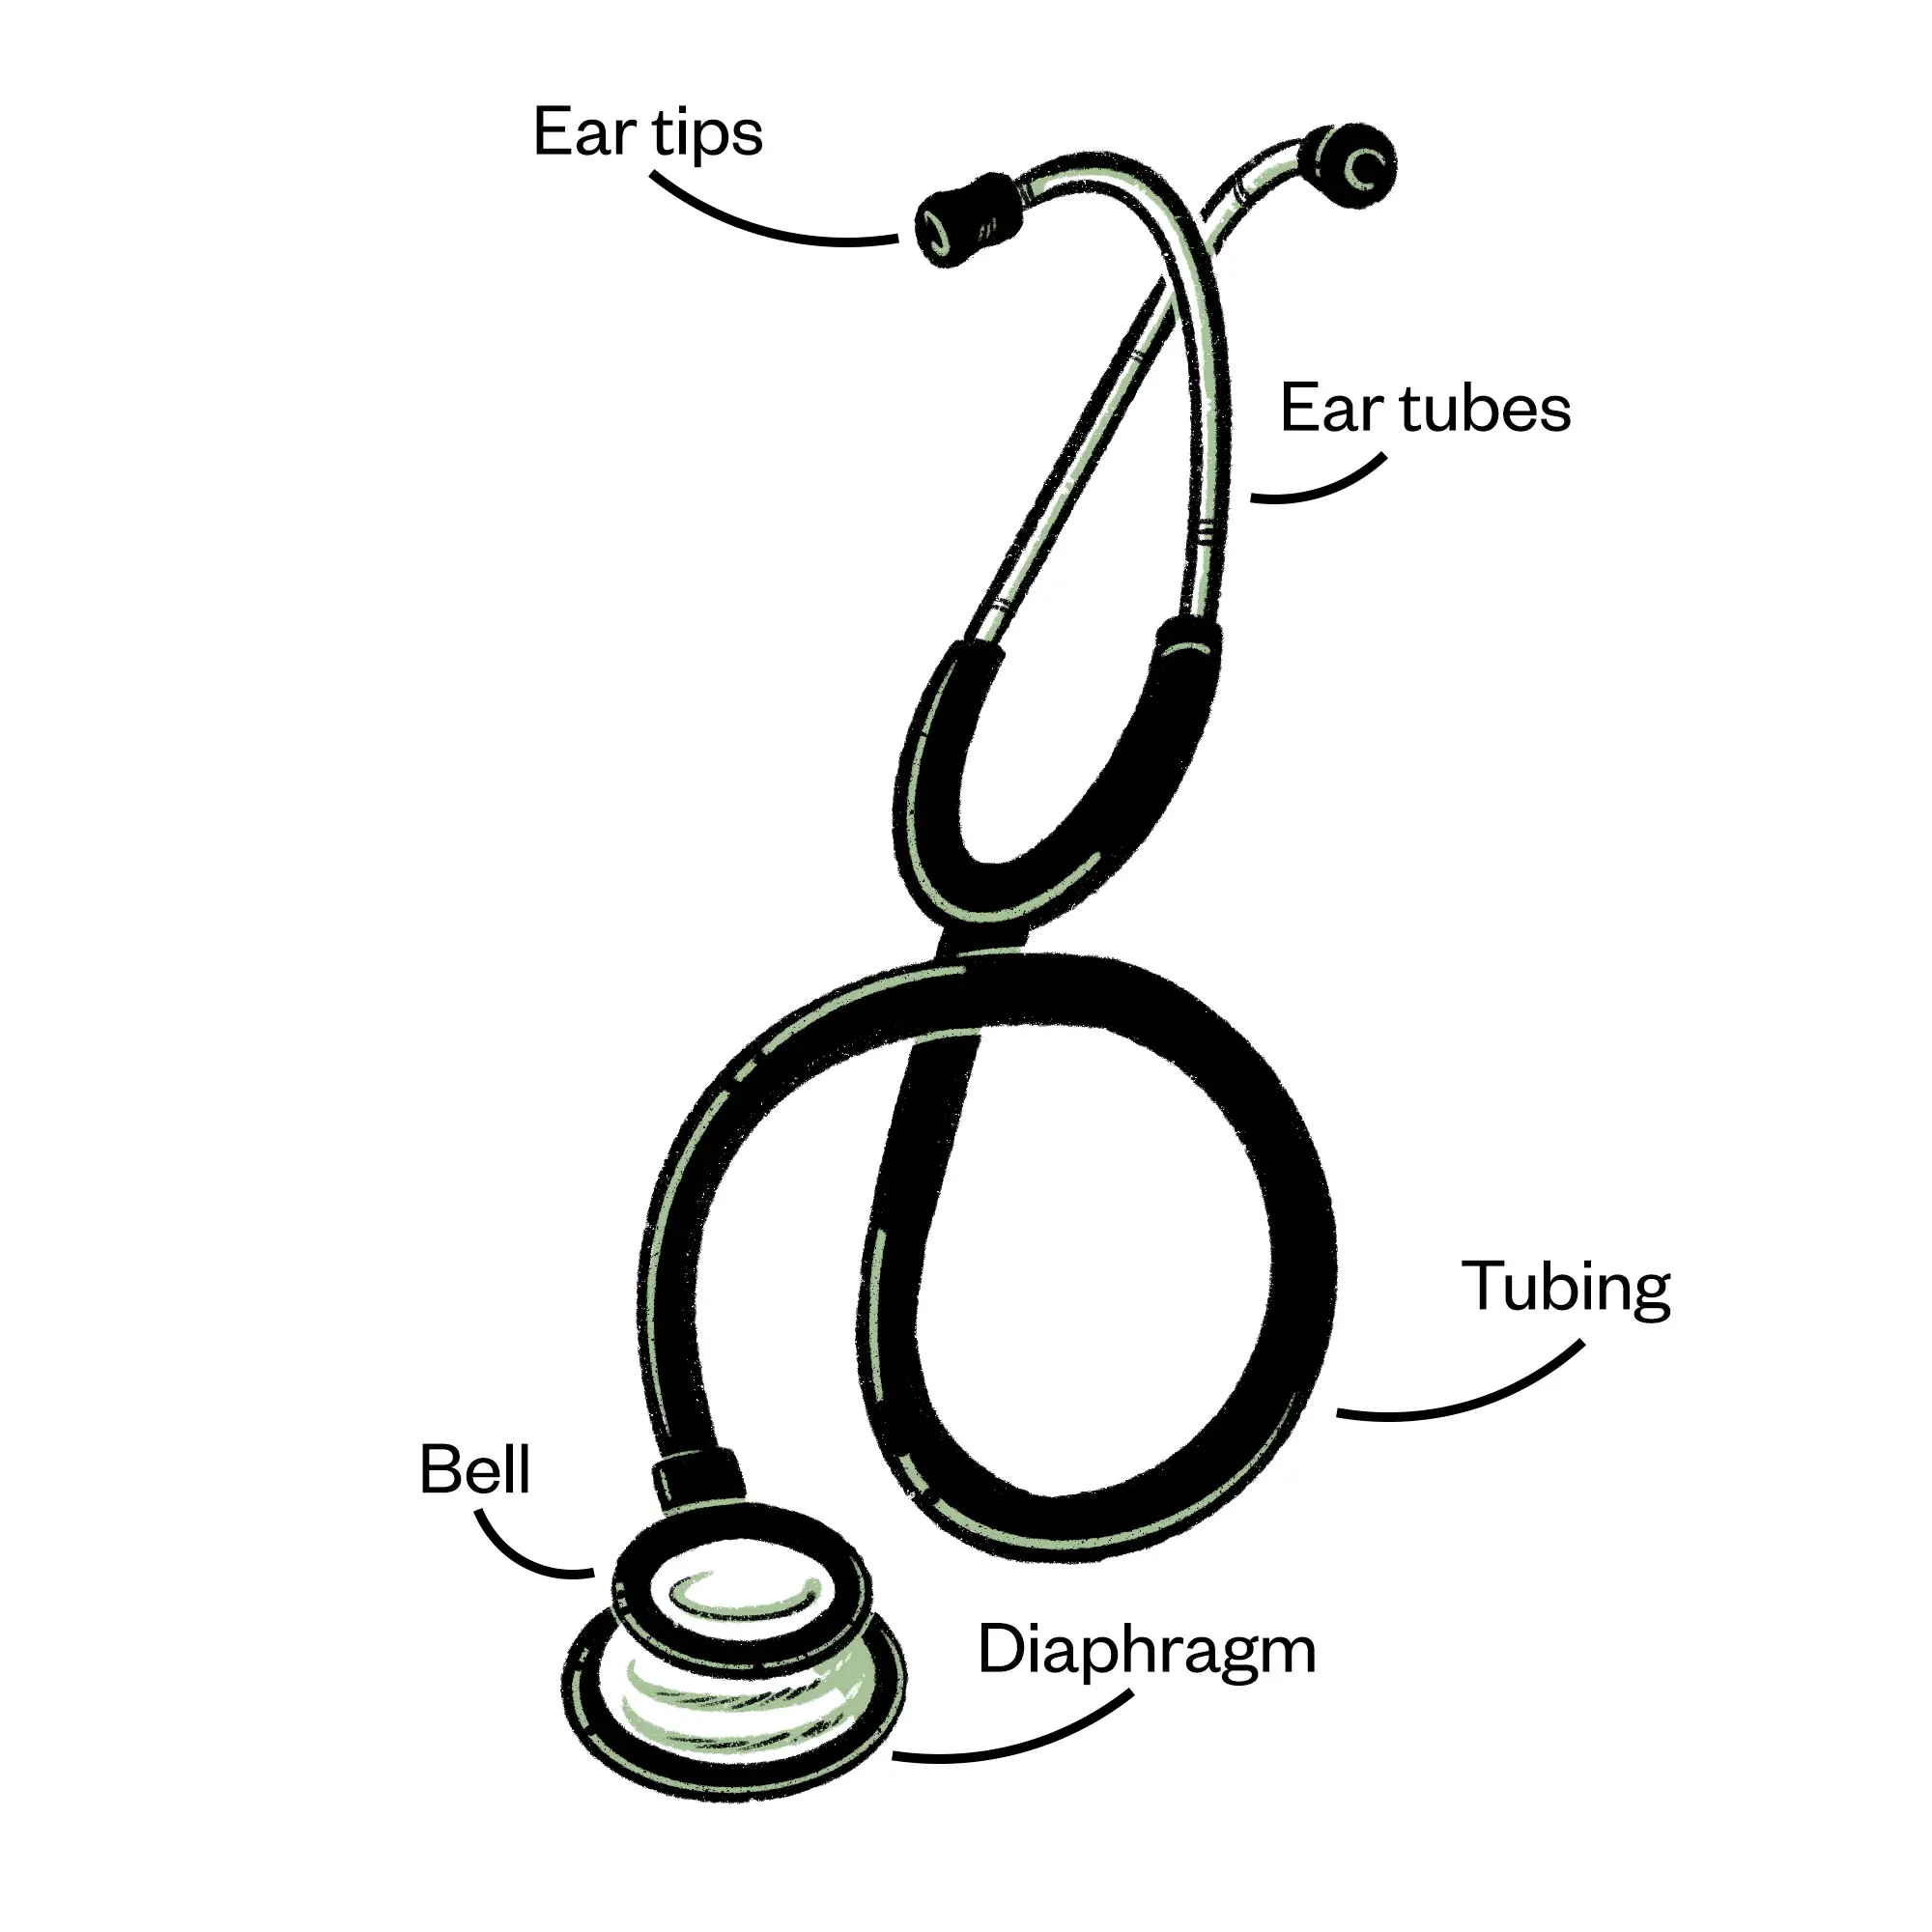
Auscultation involves careful listening to internal body sounds, primarily those produced by the heart, lungs and gastrointestinal tract, using a stethoscope. Stethoscopes consist of earpieces that go in the practitioner’s ears facing forwards, and a chest piece, which is placed on the patient’s skin. The chest piece includes a diaphragm and may also have a smaller bell on the reverse side, through which sound is amplified (see Figure 4). Higher pitch sounds are heard through the diaphragm (e.g. bronchial sounds), whereas the bell is used for lower pitch sounds (e.g. heart sounds). In addition to these normal sounds, auscultation can detect abnormal sounds or the absence of sounds within these systems. As part of a cardiac assessment, auscultation assists in identifying heart sounds, murmurs and other cardiovascular abnormalities, such as bruits. In respiratory assessment, it aids in the evaluation of breath sounds and the detection of abnormal sounds such as wheezing, crackles or pleural rubs. In gastrointestinal assessments, it can detect bowel sounds, which can indicate normal or abnormal intestinal function, or any abdominal vascular abnormalities.
Wes Mountain/The Pharmaceutical Journal
Practical application of physical examination skills
In clinical practice, these four techniques are often combined and performed in a specific order (inspect, palpate, percuss, auscultate) as part of a comprehensive physical examination; however, during the abdominal assessment the auscultation would come before the palpation and percussion to avoid disturbing the abdominal organs or altering the bowel sounds that may occur as a natural part of digestion. Training and practise are essential for practitioners to develop proficiency in these techniques and to be able to interpret their findings accurately.
When preparing to undertake physical assessment, there are several considerations for practitioners. First, the environment in which they are working needs to be appropriately arranged to allow for examinations to take place. There should be a couch set up at an appropriate height and angle for the patient to use and prescriber to be able to approach (usually from the right side). There should be a fresh roll of paper on the couch and something to maintain a patient’s dignity and provide cover when examining, such as a sheet. It is important that the environment is well lit to allow for accurate visualisation and is heated for the patient’s comfort. The environment needs to allow for a private consultation where the patient’s confidentiality can be maintained (through use of curtains or a private consultation room for example) and where there will not be distractions or disturbances. Appropriate handwashing should take place before performing a physical examination.
Patient consent and capacity
To be able to provide consent for a physical examination, patients need to be fully informed of what it will entail, the likely duration and what they can expect to feel during the process. It should never be assumed that because a patient has had an examination before that they automatically consent for it to be undertaken again. It is important that the patient’s comfort is taken into consideration and that they are warned if something is likely to be painful or uncomfortable; any potential alternatives should be explained if the patient does not want to proceed.
There may be areas that the patient wishes you to avoid during physical examinations; for example, owing to existing injuries or ailments, or certain positions that may be uncomfortable for them, and these should be discussed with the patient before starting and appropriate adaptations made. The patient’s comfort should be checked throughout the examination.
Consent raises the issue of capacity and whether the individual being examined can understand what is going to happen. Some patients, such as paediatric patients or those with advanced dementia, may lack capacity and as a consequence be unable to give their consent. In these instances, a carer, parent or guardian would usually be asked to consent on their behalf. A full discussion of consent is beyond the scope of this article but additional resources on this topic are suggested below.
For some examinations it may be appropriate to offer a chaperone — usually if the examination involves a curtain, removal of clothing, intimate examinations, vulnerable patient groups, or where the patient requests one. Guidance is available from the GMC on the use of chaperones and is also linked at the end of the article. It is important to name the chaperone who was present when documenting the examination.
Vital signs
It is customary for vital signs to be taken during a physical examination or assessment of the patient to provide insight into a patient’s more general health or to rule out an infection. Vital signs can identify a patient at risk of clinical deterioration or identify signs of a more serious disease. The normal ranges for vital signs are included in Table 3[5,6].
Pulse
Measurement of the pulse is used to assess a patient’s heart rate, which in an adult is usually 60–100 beats per minute. The pulse is generally taken in the radial artery in the wrist, as this is often the most accessible and easy to locate. The practitioner is looking to assess the character (i.e. its strength and volume), rate (in beats per minute) and rhythm of the pulse. Some causes of an elevated pulse (tachycardia >100bpm) include anxiety, fever or hyperthyroidism. Some causes of a slow pulse (bradycardia <60bpm) include medication, heart disease or sleep apnoea.
To take a radial pulse, the practitioner needs to palpate using the tips of first two fingers aligned lengthwise over the artery. The thumb should not be used as it has a pulse of its own, which can be confused with the patient’s. The pulse should be taken over a full 60 seconds to calculate beats per minute; using a shorter interval and multiplying can increase the risk of an inaccurate result and may miss an irregularity such as atrial fibrillation. In addition to the rate, the practitioner can identify the rhythm. If the pulse is irregular, the prescriber should then establish whether it is in a regular pattern of irregular beats, or if it irregularly irregular, meaning there is no pattern. The volume (large, medium or small) is dependent upon the cardiac output, the peripheral vasoconstriction and the state of the vessel walls. In terms of character, the pulse may be bounding or thready (weak).
Blood pressure
Blood pressure (BP) can be taken either manually or electronically. As a prescriber, it is important to be competent in undertaking BP by both methods. For example, if an automated device provides a very high reading, it can be useful to confirm or refute the reading by measuring it manually as well. Information on how to take BP can be found on the British Hypertension Society website. This website provides guidance and videos related to this topic.
Normal ranges for BP depend upon the age of the patient and targets may depend upon individual patient circumstances. It is important to have several readings before a diagnosis of hypertension is made. Before taking BP, the patient should be relaxed and calm. If a reading is high, the practitioner should wait five to ten minutes before repeating, as some people experience ‘white coat syndrome’ when they feel nervous in a clinical setting, which can raise their BP. Patients should be asked if they have a preference as to which arm should be used, and patients with lymphedema should avoid having their BP taken in the affected arm as symptoms may be aggravated.
Clothing on the arm should be removed so that the arm is bare. The cuff then needs to be applied to the arm in the correct position with the tubing on the inner arm — some sphygmomanometers have a line indicating where the cuff should go in line with the brachial artery. For an accurate reading, the bladder inside the cuff should encircle 80% of the arm, therefore a larger or smaller cuff size may be needed for some patients. The lower edge of the cuff should be 2–3cm above the antecubital fossa, where the stethoscope is placed.
When making an initial assessment of a patient, the blood pressure should be taken in each arm, as it can differ in some patients. If there is a difference of 10mmHg or more, there could be a cardiovascular cause. If different readings are observed, then the practitioner should use the arm with the highest reading. If any orthostatic symptoms are being experienced or identified in the patient history (e.g. dizziness on standing), the blood pressure should be taken in both sitting and standing positions.
Respiratory rate
Changes in respiratory function are increasingly recognised as the most sensitive indicator of clinical deterioration therefore attention must be given to accurate assessment of respiratory rate[7]. Normal respiration is a relaxed, subconscious activity. As a result, assessing respiration rate should be undertaken covertly where possible to avoid inadvertently influencing the patient and altering the usual rate. The normal respiration rate for an adult is 12–20 breaths per minute (see Table 4[8]). When assessing the respiration rate, the practitioner should observe the pattern of breathing, the effort and rate, noting any asymmetries between in the inspiration and expiration phase. The rate should be counted over 60 seconds.
The patient should be assessed for any signs of respiratory distress; for example, nasal flaring, wheezing, stridor, use of accessory and intercostal muscles. In infants and children aged under seven years, abdominal breathing predominates and therefore abdominal movements should be counted[9].
Temperature
Core body temperature is usually between 36.1oC and 37.2oC, with variations between individuals and at different times of day. A temperature below 35oC is considered hypothermic; above 38oC is considered hyperthermic. Patients aged over 65 years may have slightly lower average temperatures (35.8–36.8oC) and babies and children have slightly higher (36.6–37.2oC).
The quickest and least invasive way of measuring temperature is using a tympanic thermometer in the patient’s ear. Care should be taken if the patient wears hearing aids, has any occlusion of the ear canal (e.g. wax or discharge) or any nearby piercings. Similarly, if there is a suspected active infection in one ear, the reading should be taken in the other ear. If both ears are affected, it may be necessary to take the temperature from another body site (e.g. orally, rectally) noting that temperature can vary between body sites.
Pulse oximeter
Oxygen saturation (SpO2) is an indicator of the level of oxygenation of the blood in the peripheral arteries and is measured using a pulse oximeter. This is a device placed on a finger or toe and provides a reading based on the percentage of haemoglobin bound to oxygen. The nail should be free of nail varnish or dirt as these can potentially block the reading from being taken. A target reading of 96% is used for most patients (Scale 1 NEWS2); however, in patients with COPD or at risk of respiratory failure, the target is lower at 88–92% (Scale 2 NEWS2).
Case in practice
 Patient profile: Rosie is a 36-year-old female presenting with a two-week history of a cough and breathlessness, which began following three days of cold-like symptoms. The independent prescriber was able to assess her under the Independent Prescribing Service (Wales).
Choice of investigations: History take, vital signs, respiratory examination.
Initial observation: Patient is conscious and alert, not in distress or obvious pain.
History take: No history of asthma, COPD, respiratory issues. No regular medication. Non-smoker. No known drug allergies. No relevant family or social history. No red flags identified.
On examination
Vital signs: Temperature: 38.2oC; respiratory rate: 22 breaths per minute; pulse oximeter O2 sats: 96%; Pulse: 70 beats per minute, regular; BP: 125/78 mmHg
Inspection: Posture normal, no signs of cyanosis or clubbing. No use of accessory muscles. Skin appearance normal.
Percussion: Dullness to the left base
Palpation: Chest expansion bilateral and normal, no lymphadenopathy
Auscultation: Crackles audible to the left base
Interpretation: The raised temperature, respiratory rate and pulse are indicative of an active infection. The slightly lowered O2 sats are consistent with this. Audible crackles during auscultation, together with dullness during percussion, are indicative of presence of fluid in the airways, often associated with infection. The inspection and palpation were unremarkable.
Impression: Lower respiratory tract infection
Communication and documentation
After the examination has been completed, it is important to explain the results or impressions (the initial opinion of the prescriber) to the patient and what your thoughts are with regards to what happens next. This should be done when the patient is dressed and sitting back in their original position. Sometimes, the examination will reveal an abnormality that requires further investigation or may present findings that require intervention or treatment. This information can be worrying to patients and it is important to deliver this information in a way that is reassuring and clear, without causing any undue distress. Some consultation models can help to guide this process[10]. When results are communicated to patients, these should be given with reference to normal reference ranges to enable patients to understand their results in context. The patient’s health literacy should be considered so that information is communicated in an optimised format and language that they feel comfortable with. Written information or visual aids may also be useful at this point, particularly where a diagnosis of a new condition is being made, to enable the patient to access further information and refer back to after the consultation.
As well as discussing with the patient, the examinations undertaken and the findings should also be reported in the patient’s notes. Documentation is necessary for practitioners to communicate with others, to recall during future appointments, to transfer care to others, for an audit record, or for possible use during investigation of care. There are no set requirements for how to write up consultation notes and there may be distinct variations in how this is completed between settings. Some notes will be electronic and involve prepopulated fields or drop-down menus, whereas some will require handwritten notes. Often notes are entered in a free-text format; therefore, some guidance of what to include is helpful. There are some important principles suggested in the literature to support the writing of clinical records[11]. The article ‘Writing patient notes: a guide for pharmacists’ provides a general overview of good practice.
Developing your physical examination skills
Physical examination skills take time to perfect and require plenty of practice. To develop your skills further, activities could include observing others, asking others to observe you and gathering their feedback, recording yourself (with relevant permissions) to watch or listen back to and reflecting afterwards on how a consultation has gone and recording anything you would like to improve. You may also like to construct a Personal Development Plan to plan your learning and development.


Knowledge check


Expanding your scope of practice
The following resources expand on the information contained in this article:
- ‘Heart Murmur Sounds‘ — a Geeky Medics video that provides examples of a variety of heart sounds, which may be heard during cardiac auscultation;
- ‘Mental Capacity‘ — a resource hub from the General Medical Council (GMC) exploring mental capacity, law, ethics and decision making;
- ‘Intimate examinations and chaperones‘ — professional standards from the GMC that aim to provide guidance on how to put patients at ease.
- 1Fine M. The Inner Consultation – how to develop an effective and intuitive consulting style (2e). Health Expectations. 2005;8:362–3. https://doi.org/10.1111/j.1369-7625.2005.00349.x
- 2Charlton R. Learning to Consult. CRC Press 2018. https://doi.org/10.1201/9781315378770
- 3Walker H, Hall W, Hurst J. Clinical Methods: The History, Physical, and Laboratory Examinations . . Published Online First: 1 January 1990.
- 4Berman A, Snyder S, Frandsen G. Fundamentals of Nursing: Concepts, Process and Practice. 14. Pearson 2021.
- 5Welch J, Dean J, Hartin J. Using NEWS2: an essential component of reliable clinical assessment. Clin Med (Lond). 2022;22:509–13.
- 6High blood pressure (hypertension). NHS. https://www.nhs.uk/conditions/high-blood-pressure-hypertension (accessed January 2024)
- 7Cahill H, Jones A, Herkes R, et al. Introduction of a new observation chart and education programme is associated with higher rates of vital-sign ascertainment in hospital wards. BMJ Quality & Safety. 2011;20:791–6. https://doi.org/10.1136/bmjqs.2010.045096
- 8Jarvis C. Physical Examination and Health Assessment . 5th ed. United States: WB Saunders 2008.
- 9Nevin M, Mulkerrins J, Driffield A. Essential Skills. In: Coyne I, Neill F, Timmins F, eds. Clinical Skills in Children’s Nursing. Oxford, UK: Oxford University Press 2010:496. https://global.oup.com/ukhe/product/clinical-skills-in-childrens-nursing-9780199559039?cc=gb&lang=en& (accessed January 2024)
- 10Baile WF, Buckman R, Lenzi R, et al. SPIKES—A Six-Step Protocol for Delivering Bad News: Application to the Patient with Cancer. The Oncologist. 2000;5:302–11. https://doi.org/10.1634/theoncologist.5-4-302
- 11Mathioudakis A, Rousalova I, Gagnat AA, et al. How to keep good clinical records. Breathe. 2016;12:369–73. https://doi.org/10.1183/20734735.018016
1 comment
You must be logged in to post a comment.


Good overview article. Knowledge check questions do not assess well enough